Bismillahirrahmanirrahim
Assalamu’alaikum warahmatullahi wabarakatuh
Pada Project kali ini saya akan membuat LED Cube 3x3x3 Menggunakan Arduno UNO dan saya akan menggunakan pin 2, sampai dengan pin 13 pada Arduino UNO untuk menyalakan sebuah Project Lampu LED Cube 3x3x3 Menggunakan Arduno UNO, serta saya akan menjelaskan mulai dari hardware dan software berserta cara kerjanya yang bermaksud membuat para pembaca dapat mengerti dengan apa yang saya sampaikan . Aamiin.
Alat dan Bahan
- 27 Buah LED 5mm atau LED 3mm (Warna Bebas)
- 3 Buah Resistor 22k Ω (Ohm)
- 9 Buah Resistor 220 Ω (Ohm)
- 3 Buah NPN Transistor 2N2222 (atau bebas asalkan sama type)
- Kabel Jumper secukupnya
- 1 Buah Protoboard
- 1 Buah Arduino
.
Rangkaian LED Cube 3x3x3 Menggunakan Arduno

Gambar 1. Rangkaian LED Cube pada LED layer 1
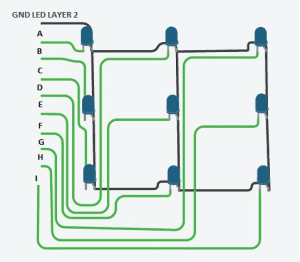
Gambar 2. Rangkaian LED Cube pada LED layer 2
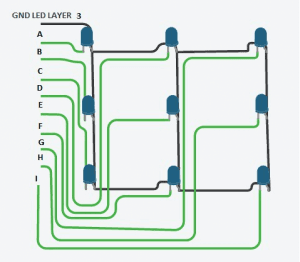
Gambar 3. Rangkaian LED Cube pada LED layer 3
.
Sketch Program LED Cube 3x3x3 Menggunakan Arduno
#include <LedCube.h>

#define SIZE 3
#define COLS (SIZE*SIZE)

byte levelPins[SIZE] = {11,12,13};
byte colPins[COLS] = {2,3,4,5,6,7,8,9,10};

LedCube cube(SIZE, levelPins, colPins);

//#define DEBUG
#ifdef DEBUG
#include <memdebug.h>
void showmem(const char label[] = "")
{
 char buffer[100];

 sprintf(buffer,"%s: %04u %04u : used/free",
 label,
 getMemoryUsed(),
 getFreeMemory()
 );

 Serial.println(buffer);
}
#endif

void setup ()
{
#ifdef DEBUG
 Serial.begin(9600);
#endif
}

void loop ()
{
 delay(10);

#ifdef DEBUG
 showmem("start");
#endif
 // paste UI output here (https://rawgithub.com/gzip/arduino-ledcube/master/ui/index.html)
 cubeFrame* f[] = {
 cube.createFrame((const byte[]) {0,6, 1,6, 2,6}, 6, 80),
 cube.createFrame((const byte[]) {0,7, 1,7, 2,7}, 6, 70),
 cube.createFrame((const byte[]) {0,8, 1,8, 2,8}, 6, 60),
 cube.createFrame((const byte[]) {0,5, 1,5, 2,5}, 6, 50),
 cube.createFrame((const byte[]) {0,2, 1,2, 2,2}, 6, 40),
 cube.createFrame((const byte[]) {0,1, 1,1, 2,1}, 6, 30),
 cube.createFrame((const byte[]) {0,0, 1,0, 2,0}, 6, 20),
 cube.createFrame((const byte[]) {0,3, 1,3, 2,3}, 6, 10)
 };
#ifdef DEBUG
 showmem("before free");
#endif
 cube.lightFrames(f, 8);

 // light each light one at a time
 for(byte level=0; level<cube.getLevels(); level++)
 {
 for(byte col=0; col<cube.getCols(); col++)
 {
 cube.lightPulse(level, col, 100);
 }
 }

 // light one level at a time, increasing speed each time
 for(byte d=25; d>2; d-=2)
 {
 for(byte l=1; l <= cube.getLevels(); l++)
 {
 cube.lightLevel(l, d);
 }
 }

 // light each row on each level
 for(byte level=1; level<=cube.getLevels(); level++)
 {
 for(byte row=1; row<=cube.getLevels()*2; row++)
 {
 cube.lightRow(row, level);
 }
 }

 // light each plane
 for(byte i=3; i; i--)
 {
 for(byte row=1; row<=cube.getLevels()*2; row++)
 {
 cube.lightPlane(row, 10*i);
 }
 }

 // single random light at a time
 cube.randomLight(random(25,100),100);

 // random column drop
 for(byte x=0; x<=15; x++)
 {
 cube.lightDrop(random(0,cube.getCols()), random(50,150));
 }

 // circle around cube at a random level
 for(byte x=0; x<=5; x++)
 {
 cube.lightPerimeter(random(0,cube.getLevels()), random(1,5), random(25,100));
 }

 // light each face
 byte planes[] = {cube.getLevels()+1,cube.getLevels(),cube.getLevels()*2,1};
 for(byte i=5; i; i--)
 {
 for(byte p=0; p<sizeof(planes); p++)
 {
 cube.lightPlane(planes[p], 5*i);
 }
 }

 // random columns
 cube.randomColumn(25);

 // turn off a single column randomly
 cube.enableBuffer();
 for(byte c=0; c<30; c++)
 {
 cube.fillBuffer();
 cube.invertBuffer();
 cube.randomColumn();
 cube.drawBuffer(7);
 }
 cube.enableBuffer(false);

 // cols in and out
 for(byte c=1, d=0; c<=10; c++)
 {
 if(c%2 == 0)
 {
 for(d=0; d<20; d++)
 {
 cube.lightColumn(2,1);
 cube.lightColumn(4,1);
 cube.lightColumn(6,1);
 cube.lightColumn(8,1);
 }
 }
 else if(c%4 == 1)
 {
 for(d=0; d<30; d++)
 {
 cube.lightColumn(1,1);
 cube.lightColumn(3,1);
 cube.lightColumn(7,1);
 cube.lightColumn(9,1);
 }
 }
 else
 {
 for(d=0; d<70; d++)
 {
 cube.lightColumn(5,1);
 }
 }
 }

 // diamond and box
 byte diamond[] = {0,4, 1,1, 1,3, 1,4, 1,5, 1,7, 2,4};
 byte box[] = {
 2,0, 2,1, 2,2, 2,3, 2,5, 2,6, 2,7, 2,8,
 1,0, 1,2, 1,6, 1,8,
 0,0, 0,1, 0,2, 0,3, 0,5, 0,6, 0,7, 0,8
 };
 cube.lightSequence(box, sizeof(box), 200);
 cube.lightSequence(diamond, sizeof(diamond), 400);

 // helicopter effect
 byte topSeq[8] = {0,3,6,7,8,5,2,1};
 byte botSeq[8] = {8,5,2,1,0,3,6,7};
 for(byte loops = 0, delay = 50; loops<=8; loops++)
 {
 for(byte s=0; s<8; s++)
 {
 byte seq[] = {2,topSeq[s], 1,4, 0,botSeq[s]};
 cube.lightSequence(seq, sizeof(seq), delay);
 }
 if(loops < 5) delay-=10; else delay += 10;
 }

 // turn off one light at a time
 cube.lightsOut();
}Untuk mencoba project ini anda harus download Library nya, pada link dibawah ini.
https://drive.google.com/open?id=0B2ChxtuRzSJ3eVh6OW1kakNRQXc
Untuk Cara Menambahkan Library pada Arduino IDE dapat dilihat pada link berikut ini.
.
DEMO LED Cube 3x3x3 Menggunakan Arduno UNO
Terimakasih, saya harap project ini dapat bermanfaat, dan apa bila ada pertanyaan jangan malu untuk bertanya
Wassalamu’alaikum warahmatullahi wabarakatuh